Publish Products using cookie method
Note: This only works for GBP locations that haven't been linked to Merchant Center. To use this feature, unlink Merchant Center first.
Because the Google Business Profile API does not support publishing products to your GBP listing, an alternative method has been developed. This feature is available to all premium users of the plugin.
To allow the creation of products, first make sure you have a Google account connected to the plugin.
- Navigate to the Google settings (Post to GMB > Settings > Google settings). Connect your Google account if you haven’t already.
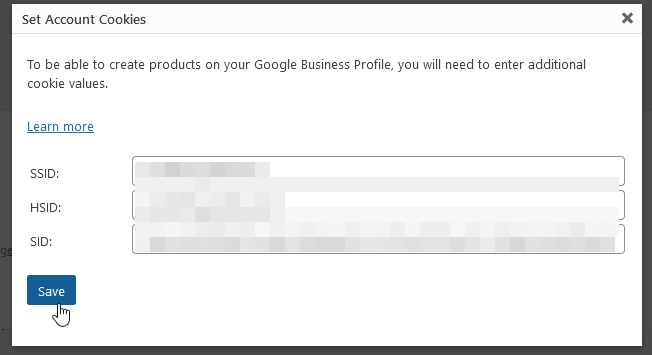
- Click “Set Cookies” next to the account that you want to set up for creating products.
 A dialog will open that will allow you to enter cookie details for the account.
 - Open a new Incognito/private browsing window in your browser. (Firefox: Ctrl+Shift+P, Edge/Chrome: Ctrl+Shift+N)
- Navigate to business.google.com in the incognito window
- Log in to the Google account that you want to set up for product publishing
- Open the browser console (Firefox/Chrome: Ctrl+Shift+J, Edge: Ctrl+Shift+I)
- Chrome:
- Open the “Application” tab (you may have to press the 2 arrows pointing to the right to reveal it).

- Under “Storage”, open the “Cookies” section and select https://business.google.com
- Open the “Application” tab (you may have to press the 2 arrows pointing to the right to reveal it).
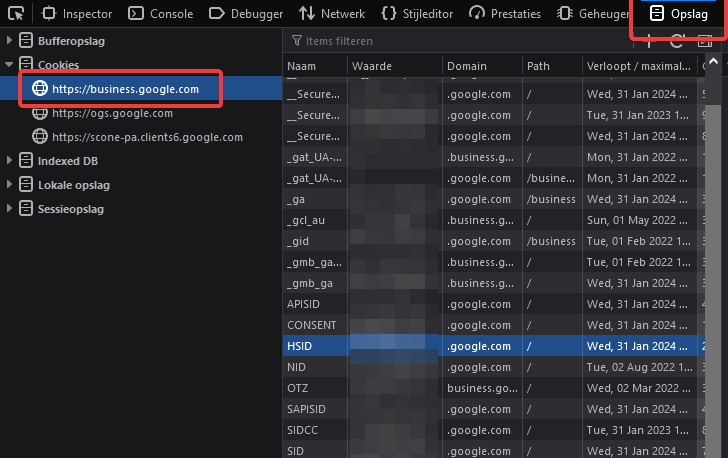
- Firefox:
- Open the “Storage” tab (you may have to press the 2 arrows pointing to the right to reveal it)
- Select https://business.google.com under the “Cookies” section.

- Chrome:
- Look for the SSID, SID and HSID cookies. If there is more than one of them with the same name, pick the one associated to .google.com domain.
- Copy the value of each the cookie by double clicking the value and pressing CTRL+C, and paste it into the associated field in the plugin.

- Press “Save” and save the plugin settings.
- Product creation will now be available for the selected account.
How to (auto-)publish your WooCommerce products
Enabling the Products post type
The plugin comes with built-in support for WooCommerce, and can be used to (auto-)publish your latest WooCommerce products to your GBP listing. To get started, enable the plugin for the “Products” post type. To do this, go to Post to GMB > Settings > Post type settings and tick the box next to “Products”, then proceed by pressing Save settings.

The Post to Google My Business post creation dialog & auto-post checkbox will now be available when you add or edit WooCommerce products.
Setting up an auto-post template for your products
The plugin comes with a pre-configured template for products, but it can be adjusted to suit your needs. To adjust the template, go to Post to GMB > Settings > Auto-post settings.
In the “Default template” section, switch to the “Product” tab.

As you can see most of the fields are already pre-filled with a value. These placeholders will be replaced by their corresponding value when the product is published to your GPB listing. The following placeholders are available for WooCommerce products:
- %wc_product_name%
- %wc_product_description%
- %wc_product_short_description%
- %wc_product_sku%
- %wc_product_virtual%
- %wc_product_price% – Replaced by the current price of the product
- %wc_product_regular_price% – Replaced by the price when the product is not on sale
- %wc_product_sale_price% – Replaced by the price when the product is on sale (example usage: Was: %wc_product_regular_price%, now on sale: %wc_product_sale_price%)
- %wc_product_price_including_tax% – If the product has VAT/tax, this is replaced by the price including tax
- %wc_currency_symbol% – Replaced by the “currency symbol”, e.g. $, €.
These placeholders can be used in the Product name, Price, Product description and Button URL fields. Aside from these WooCommerce-specific placeholders, there are also generic WordPress placeholders, such as %author_first_name%, %site_url%, and placeholders that contain information about the location that the product is published to.
Manually creating a product
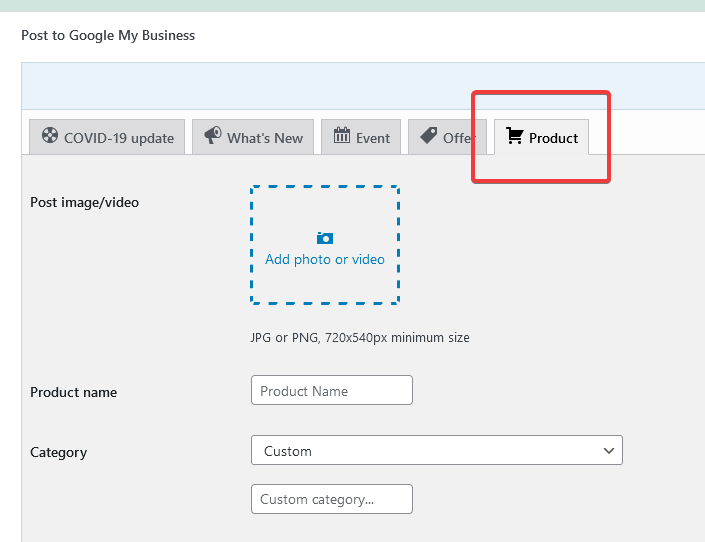
You can also manually create a product through the product creation dialog. To do this, navigate to the WooCommerce product that you wish to create a new GBP product for (in your WordPress dashboard). Then scroll down to the Post to Google My Business section and select the Product tab:

This section allows you to manually create or schedule a Product to be published to your GBP listing. Like in the auto-post template, you can also use the placeholder variables here.
Creating multiple templates
The Pro and Agency version of the plugin allow you to create multiple auto-post templates for different occasions (instead of one generic template). To create one or more templates, go to the Post to GMB > Auto-post templates section. Here you will be able to add a new template in the same way as described above.
Setting a default template
By default, the plugin will use the basic auto-post template as defined in Post to GMB > Settings > Auto-post settings. To have the plugin automatically select a specific template when creating a new WooCommerce product, go to Post to GMB > Settings > Auto-post settings, and set the appropriate default template for the Products post type:

Choosing a different template “on the fly”
The setting described above will just define which template is selected by default for each post type. You can also change the template just before publishing your product:

